|
The sights
During the lifespan
of the Panzerschreck system the sights were continuously improved since
the
inaccuracy of the sights was judged as the biggest problem with the
weapon. Due
to this there is a variety of sights that can be observed, and most of
the time
the sights will help us "date" the variation of the Panzerschreck.
The sights are of course closely linked with the ammunition. Due to
this we can
divide the sights into two main categories; sights for the Raketen
Panzerbüchse
Granate 4322 (RPzBGr 4322) and sights for the Raketen Panzerbüchse
Granate 4322
and 4992 (RPzBGr 4992). But both types of rockets came with a
winter-powder
and a summer-powder, so it gets more complicated.....
In order to obtain a best possible view (less blurring to the eye) it
was
recommended that the line of sight was made as long as possible by the
gunner
by holding his head as far to the rear as possible.
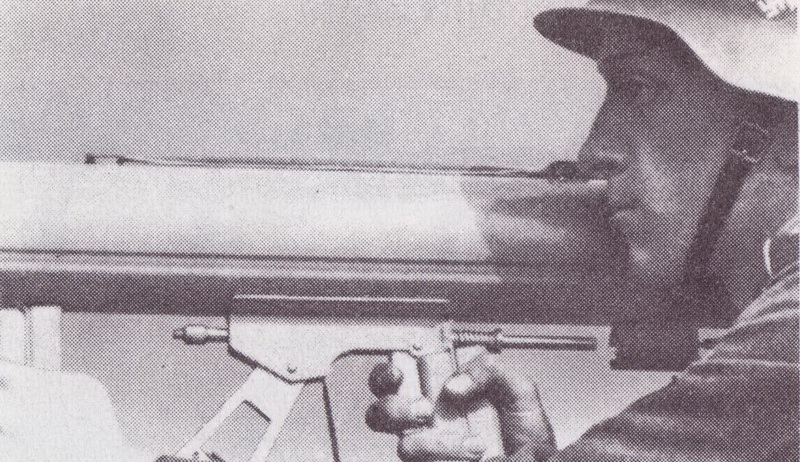
Aiming
the Panzerschreck with his head retracted as far as possible.
I
will designate the
different sights with model numbers, but these are entirely to keep
track of
the development. The Germans used descriptive names for them and never
divided
them up like that. All improvements of the sights ensured full
interchangeability with earlier versions of the sights and older
ammunition.
Initial
production
The first
Panzerschrecks delivered to the front line troops in October 1943
had the
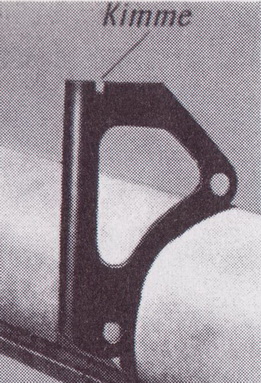
Model I front and rear sights. The rear sight consisted of a simple
bracket
that was welded directly to the side of the tube. The sides were bent
forwards
to strengthen the construction, apart from the top that was left flat.
Two
holes were also stamped in the bracket and used in the positioning
process
prior to welding the bracket to the tube. A small square was
cut out in
the bracket top to act as a sight notch (Kimme).
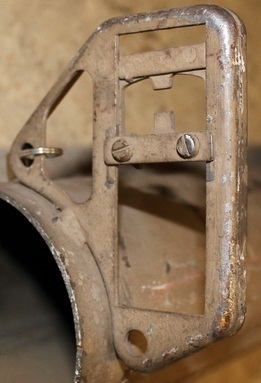 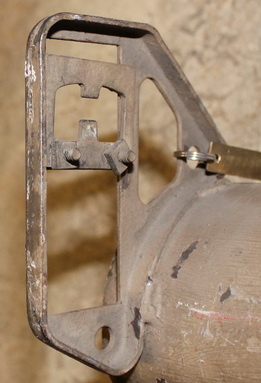 
The front sight was a bracket that
was slightly larger and mirrored to
the rear one. It had all the sides bent backwards for strength and the
same two
holes. The frame was left as open as possible to ensure that the firer
would get a best possible view of his target. The actual post (Korn)
was placed
on a frame that could be adjusted by an armourer with the appropriate
tools.
Since the weapon was introduced with two types of ammunition
(summer/winter
powder but same technical name for the rocket) the front sight had two
posts.
One pointed upwards and one downwards within the same frame. There were
no
adjustments for the firer, he simply had to choose which post to use
according
to temperature and rockets available.
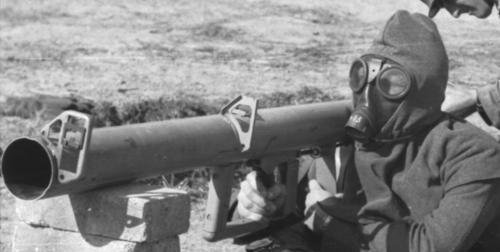 
The
first model of sights in use on a shooting range in the spring of 1944.
The front sight frame appears to be blued.
The sight
was a weak spot
in regards to more than the accuracy. The D1864/1 points it
out:
"Ensure that the sight is not bent when laying down the
weapon". (Beim Hinlegen
beachten, daß Visier nicht verbogen wird).
The first
improvement,
a necessity
The first
improvement was a necessary upgrading of the rear sight. The simple
notch cut
in the rear sight bracket wasn't possible to adjust sideways. It is not
known
when or how this improvement was introduced, but it was already in use
when the
D1864/5 was released. The D1864/5 was issued on 24
February 1944 and
is a handbook dedicated to the updating of the Panzerschreck from the
early
version to the late version. Only the Model I rear sight was pictured,
but the
text about the sight-alignment procedure states that "for newer weapons
with the adjustable rear sight also this has to be adjusted".
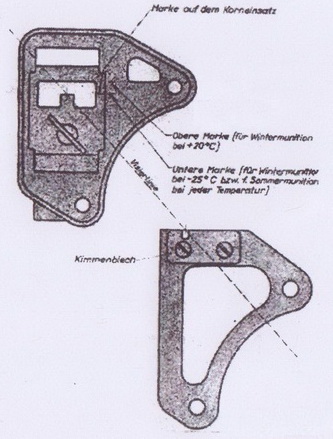 
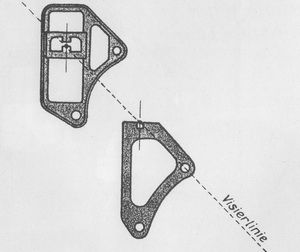
The
illustration is from the later D1864/1 released in June 1944.
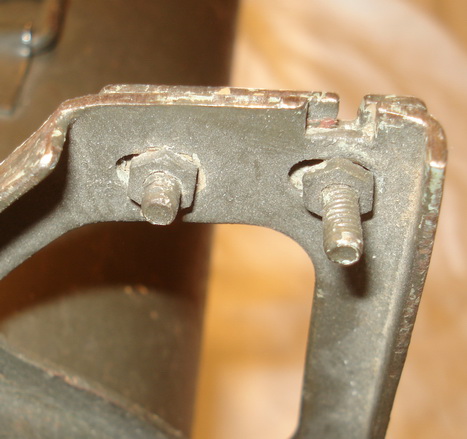
The modification was
pretty straightforward. The old notch was widened to both sides and two
oblong
holes were filed out in the bracket. Then a new adjustable sight plate
(Kimmenblech) was mounted with a pair of nuts and bolts. The weapon
could then
be zeroed according to the instructions and the rear sight adjusted
sideways.
This sight was also manufactured like this on new weapons. The manual
describes
it as "Visierhalter neuester form".
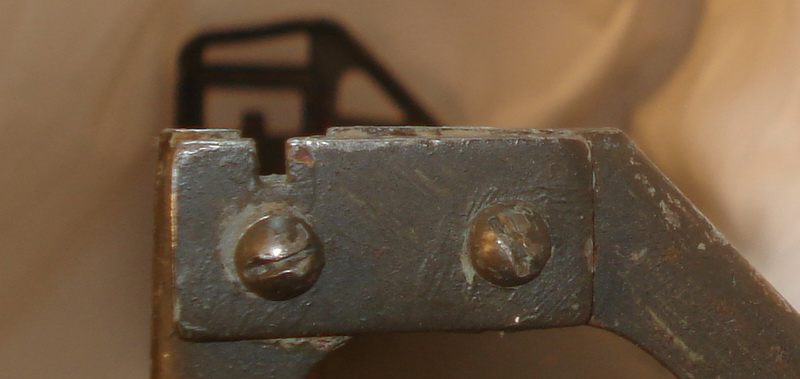
The
improved Model II rear sight
The second
improvement, part of a
package deal
The second improvement was made to
the front sight. The first model of
the front sight was adjustable in height, but only with tools and as
part of
the sight alignment procedure. The D1864/5 goes into detail
about
upgrading the sight by removing the old from the frame and replacing it
with a
new. The new sight was adjustable by the firer with a wing
nut according
to temperature/ammunition and had only got one post.
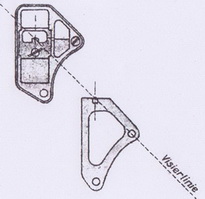 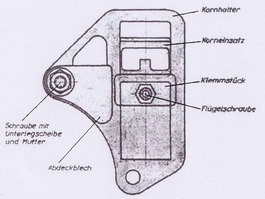 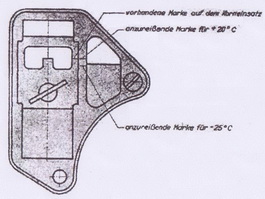
Illustrations
from the D1864/5, showing the upgraded Model II sight.
Note that the rear sight is still the unmodified Model I.
The sight was also made a lot less
transparent. There was even a plate
(Abdeckblech) covering parts of one of the previous holes. This is
closely
linked with the introduction of the shield. In order to avoid breakage
of the
window glass the new sight would absorb most of the burning particles
from the
rocket motor. "The post is adjustable, because the elevation of the
tube depends on the changing temperatures. The
wing nut makes the adjustment easier. The cover plate is used to
protect the window
glass in the shield". (Das Korn ist verstellbar,
weil mit wechselnden Temperaturen eine andere Erhöhung des Rohres
erforderlich
ist. Die Flügelschraube erleichtert die Verstellbarkeit. Das
Abdeckblech dient
zum Schutze des Fensters im Schutzschild).
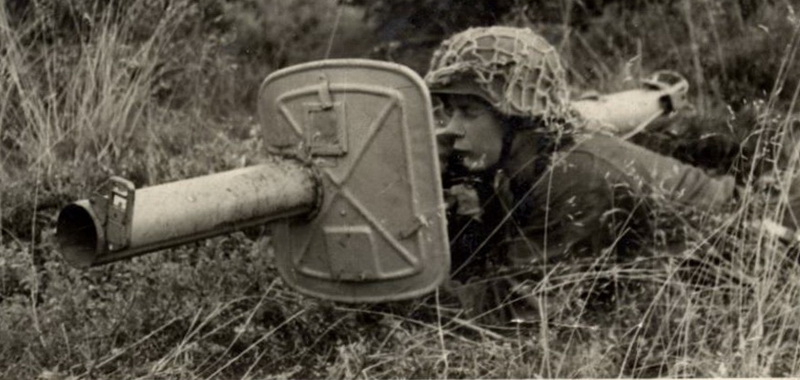
Carefull
aiming, but no rocket is connected! This weapon has the upgraded front
sight (Model II) with the Abdeckblech installed.Redesigning
the front
sight
After the
introduction of the shield the front sight needed redesigning. It
didn't make
sense to first stamp out the open areas and then having to bolt on a
protective
plate again. The new front sight didn't change the actual configuration
of the
sight, it was just a more massive body. Not only did it "fill in" the
hole that had to be covered by the "Abdeckblech", it also
became
stronger, stiffer and got a reduced profile. Most probably due to
complaints
from the front, the rearward bent edge was increased to the double,
giving a
much sturdier sight. The Model III sight was only fitted to
newly
manufactured Panzerschrecks. It was drawn in the D1864/1 that
was
published in June 1944, so it is reasonable to expect that it was in
production
from mid-1944.
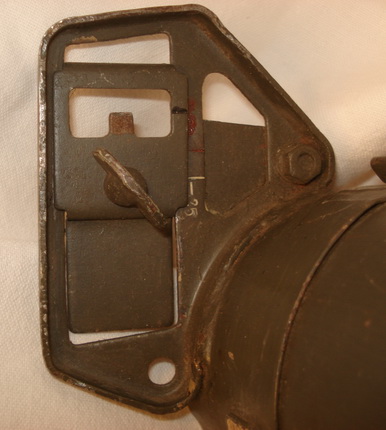 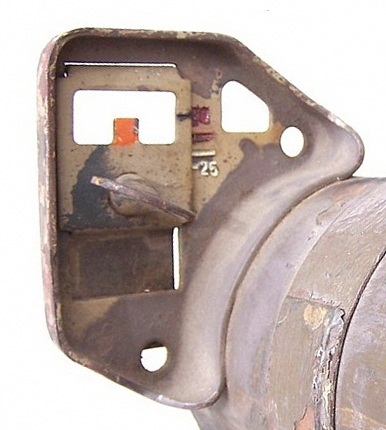
The
Model II and Model III front sight compared side by side.
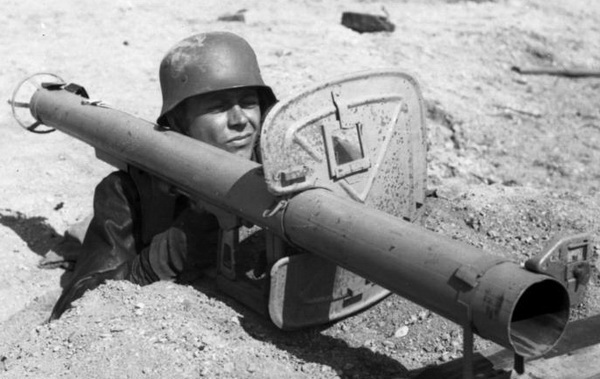
The
improved Model III front sight in use. Note all the specks to the
shield from
the burning rocket motor. With some imagination you can also see the
outline of
the massive sight on the shield.
A more
advanced rear
sight is needed
Let's
take a
theoretical look at aiming at tanks. It is "easy" enough to aim and
shoot at a tank that sits still. If the tank is moving directly towards
you
just aim a little lower (since it will be closer by the time the rocket
reaches
it). If the tank is driving in front of you at an angle, it gets more
complicated. You will have to aim in front of the tank, so that the
tank and rocket meet each other in a different location than the one
the tank occupy at
the moment of firing. The answer to this problem was a simple device
that
substituted the "Kimmenblech" (the adjustable notch). This appears to
have been invented by the troops themselves as it is found in the
Appendix
section 3 of the D1864/1 as "Improvements suggested by the
troops".

The blueprint was
meant for the waffenmeisters so that they could manufacture their own
"Verbreitertes Kimmenblech" (Widened sight) to upgrade the
older weapons. The only modification to the actual weapon if it already
had the
"Kimmenblech" (Rear sight Model II) was to shave off 4mm of the sight
bracket top so that all notches would work.
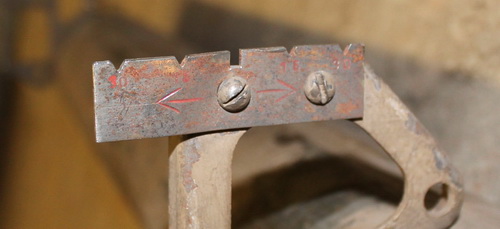
Rear
sight Model III. A unit made "Verbreitertes Kimmenblech".
The actual manual
has a separate section on how to use the "Verbreitertes Kimmenblech".
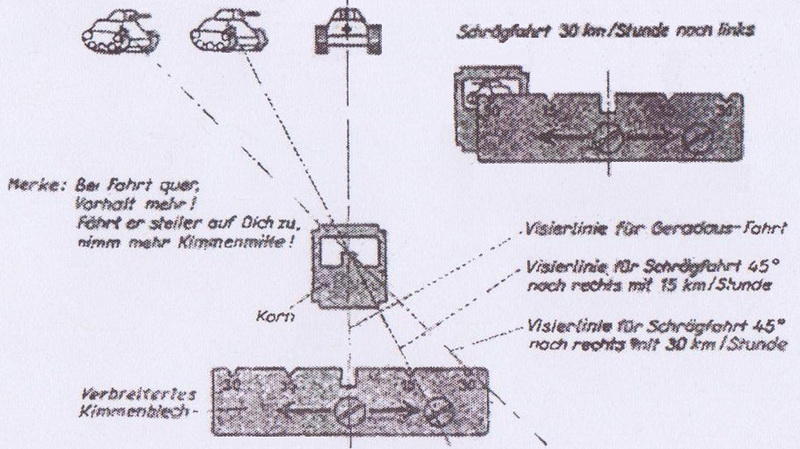
The numbers "15" and "30" relates
to the anticipated
speed of the tank driving crosswise towards you at a 450 angle. The
use of the lead-sight is quite logical. When you aim over one of the
notches,
just make sure the tube is pointing in front of the oncoming tank. The
manual
even has a small rhyme to make you remember: "Bei Fahrt quer, Vorhalt
mehr". (When travelling crosswise, lead more).
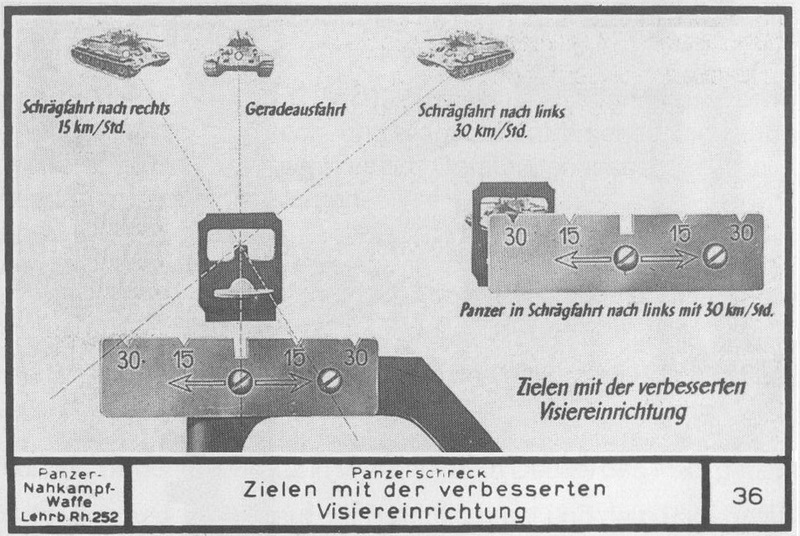
The
slide series about close combat with tanks also had a slide about it,
but
called it "Verbesserten Visiereinrichtung" (Improved rear
sight).
New
ammunition, new
sights
One
of the problems
with the Panzerschreck was the low performance of the rocket, the
RPzBGr 4322.
It gave a maximum combat range against tanks of 150 meters, and the
powder
continued to burn for 2 meters after the rocket left the tube. A new
rocket motor was finally developed and saw action from the end
of 1944. With the improved ballistic performance of this motor
a
new
set of sights had to be installed on all weapons firing the new
ammunition. It
was introduced together with the Raketen Panzerbüchse 54/1, but it was
stressed
that the ammunition could be fired from both models of the weapon. The
situation must have been a logistic nightmare. The difference between
the 54
and the 54/1 constituted no problem, as the ballistic properties of the
weapons
were identical. The big issue was the new rocket with the longer range.
This
problem was solved very neatly; new sights were invented that
would work
with both the old RPzBGr 4322 motor and the new. The drawback
with the new sights was that they once again introduced multiple posts,
this
time 3!
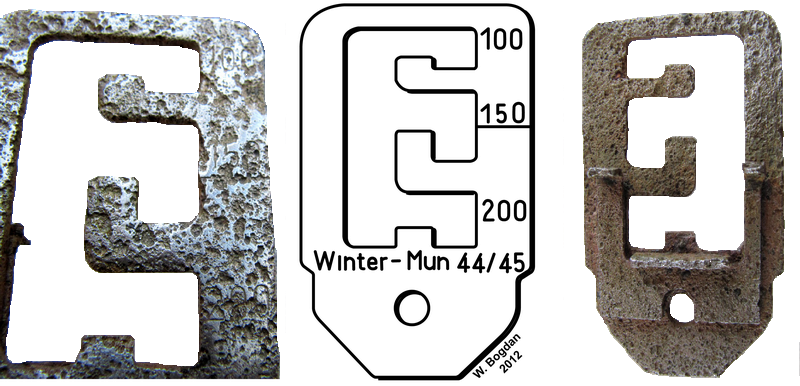
I haven't been able to find any
good pictures
of a surviving example of this sight, but one original specimen has
been
unearthed in the Baltikum. The line under "150" is the alignment mark
for the temperature setting that would be found on the right side of
the sight
frame. This is the Model IV front sight.
The new rocket motor was
marked "Arkt. 44/45" while the new ammunition was designated
"Winter-Munition 1944/45".
|
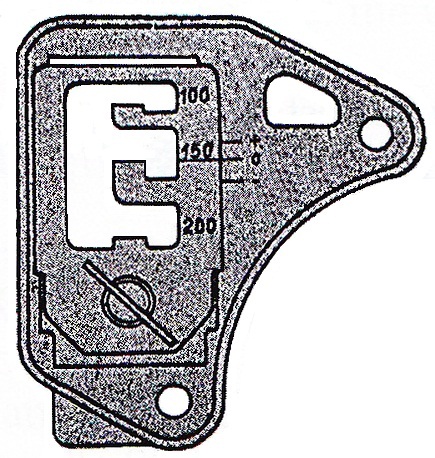
|
The
Model IV front sight as it was drawn in the D 1864/6 handbook for the
RPzB
54/1. The picture clearly shows the new setting marks (3 compared with
2
earlier). The original sight above has the wording "Winter-Mun 44/45"
engraved/stamped directly on the sight, while the manual picture lacks
this detail.
The sight was matched with the new rocket motor and it was essential
that both
sights were changed when the new rocket was used with the RPzB 54 or
RPzB
54/1. But it was also compatible with the old rocket |
A notch isn't just a notch! With
the improved Model III rear sight came
the "lead range", that was determined by the distance between the
lead-notches (0-15-30). With the new rocket came a greater combat range
and
higher velocity. Due to this a new "Vorhaltekimme" Model IV was
developed.
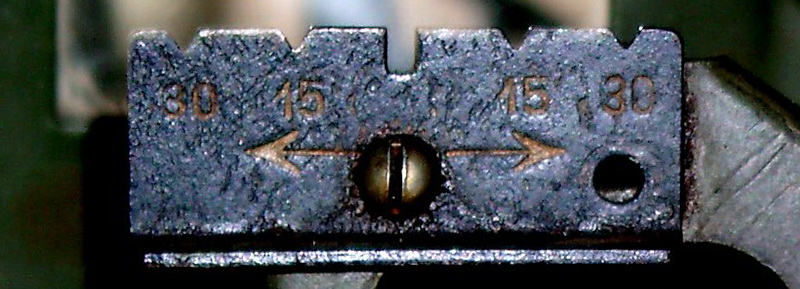
The
Model IV rear sight. One screw is missing on this museum
exhibit, as well as the front sight.
With the higher velocity of the
new rocket the space between the
notches was shortened considerably. In addition the lower edge was bent
rearwards for strength. Even though the new front sight could be
adjusted for
both types of rocket, the lead-range notches of the new rear sight
would only
be useful with the new rocket!
The infrastructure was at this
time under constant attack, but the
German supply system still managed to come up with a brilliant
solution! The
new sights were issued together with the new ammunition! Every second
box of
the new RPzBGr 4322 with the new motor also contained a set of the new
front and rear sights and a
instruction sheet was glued inside the lid.
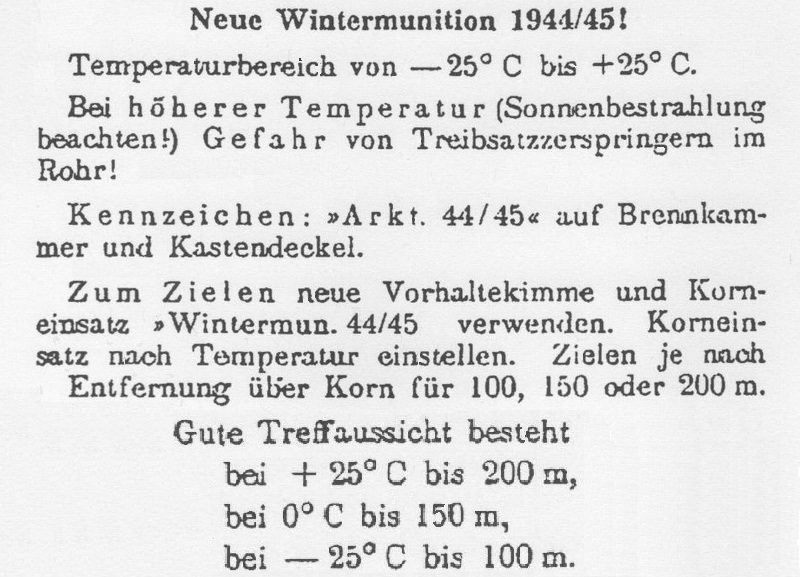
Even
with the
improved rocket "A good
chance to hit" was only obtainable at 100 meters in minus 250 Celcius.
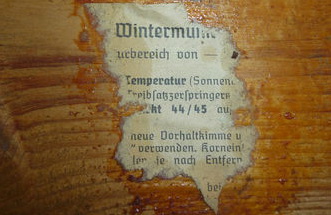
A
fragment of the label above found inside a box of 4322 grenades with
Arkt 44/45 motors.
Together
with the new front and rear sight was also a instruction sheet:
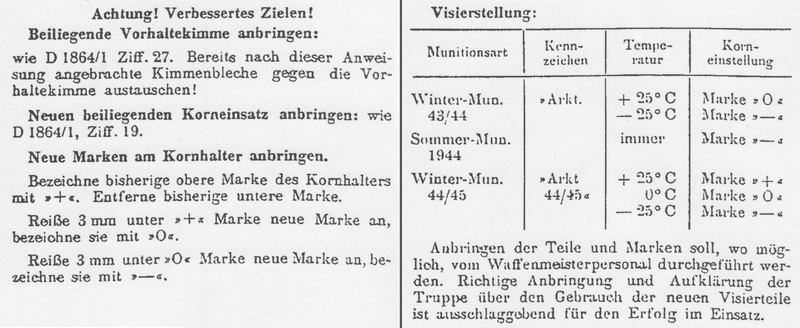
It
was stressed that both the front and rear sight had to be
replaced at the same
time.
Paint
The front sight post was painted with white paint for easier
aiming.
The
sight has been tested for radiation without any results, and it doesn't
appear to be phosphorous either. Just plain white paint.
Sight
alignment and zeroing
If you want a weapon
to hit anything, it is vital that the sights and tube are in alignment;
that
they point in the same direction. With the introduction of the
adjustable post
(Front sight Model II) the troops also needed a procedure that would
help them
to put the temperature alignment marks on the right spot on the sight
frame.
After the alignment marks were placed on the frame the same procedure
was used
to ensure that the sights were correct, especially with the new
adjustable rear
sight.
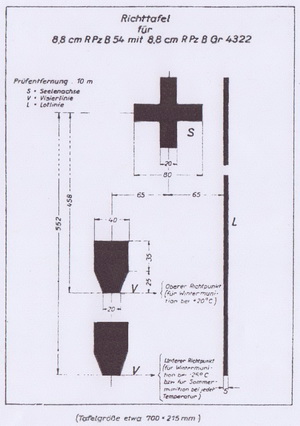
First of all a sight-alignment board (Richttafel) had to be made up.
This was
simply drawn up in the right size from a template that was printed in
the
manuals. The D1864/5 issued in February 1944 had a Richttafel
for the
"Wintermunition", and the D1864/1 issued in June 1944 had one
very similar that was for both winter and summer ammunition. All
measurements
are identical; the only difference is in the text. The last one uses
the same
aiming point for minus 25 degrees winter and all summer ammunition.
Pictures
below can be enlarged by clicking on them.
|
|
 |
| D1864/5 |
D1864/1 |
The
"Richttafel" was drawn up in the size 21,5 cm X 70 cm. The cardboard
drawing was placed at a precise distance of 10 meters from the weapon.
The
weapon had to be placed in a holder or bracket, or simply placed on the
ground.
The first goal was to align the tube with the cross on the drawing
marked
"S" (for "Seelenachse", or centerline).
|
|
To
achieve this 4
groves 1mm deep had to be filed out with a triangular file, and they
had to
be placed at a 900 angle at the muzzle. Then the same 4 groves
had to be added to the rear end of the tube. |
|
Then
a temporary crosshair was placed in each opening of the tube. The
crosshair was simply made by placing two strings at a 900 angle. To
"glue" the strings to the tube normal grease or wax could be used.
The middle of the crosshair had to be in the centre of the tube.
|
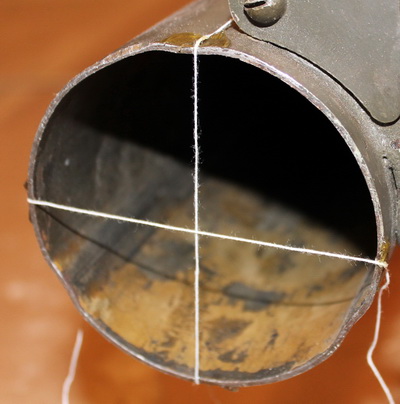 |
The two
crosshairs were then aligned on the cross marked "S". The vertical
line "L" (Lotlinie) was used to ensure that the weapon was held
vertical. Sighting along the sidewall of the sight bracket along the
"L"
line would ensure this.
The weapon would now be zeroed on the "target" S, and the sights
should then be adjusted to point at the lowest edge of the upper figure
"V". The adjustable post had already got an alignment mark, and at
the corresponding position on the sight frame a alignment mark
and the
text "+200 C" was placed. The procedure was then
repeated with the lower figure "V" and the mark
for ”+250 C"
was placed in the correct position. It was stressed that one should
again check
that the tube was aligned at the "S" mark.
The guidelines and sight-picture
doesn't say anything about how often
the sights should be checked.
The introduction of the new rocket
motor with extended range
didn't require a new "sight-board". The same Richttafel was used
until the end of the war. The sights for the new rocket required a new
set of
markings, but this was simply done by measuring millimetres. The
original
instruction can be seen in the picture above the Richttafel above. The
old
"+200 C" was used as a starting point. Only the
"+" was kept, all other markings were removed. 3 millimetres below
the "+" mark a "0" mark was placed and 3 millimetres
below that a "-" mark.
The table in the picture above the "Paint" headline
was used to
determine the correct settings based on the ammunition in
use and the
current temperature.
Sighting
In order to stop a
tank, a good hit was required. But first of all you actually needed to
hit the
tank. The challenge was to get the elevation of the tube right
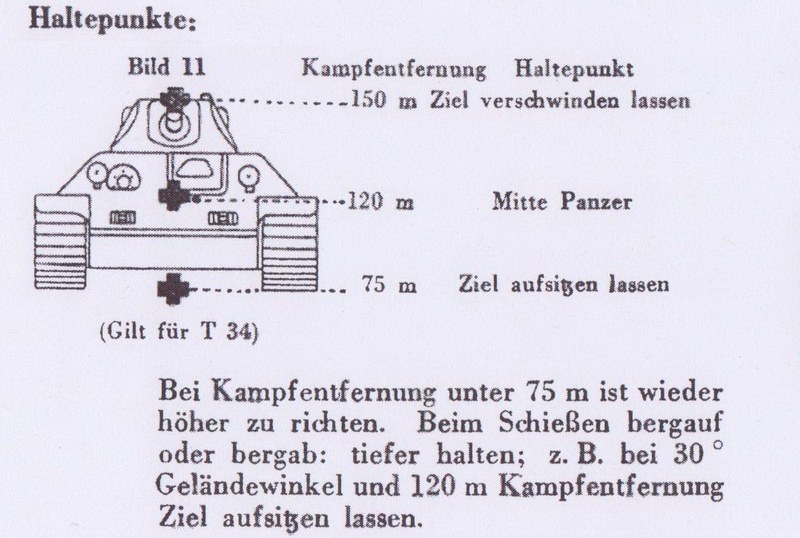
This illustration from the user handbook gives
the firer a set of "pre-programmed" aiming points
Several variables came into play
to get the elevation right.
|
-Distance
to the target
|
|
-Temperature
|
|
-Type
of ammunition
|
The rockets
launched from the Panzerschreck did not travel in a straight line
towards the
target; they had to go in an arch. The first type of rocket motor burnt
out
after 3,5 meters (2 meters after it left the weapon). The temperature
of the
rocket motor was the crucial factor. The higher the temperature, the
more power
from the rocket. The type of ammunition was closely linked to
temperature of
the combat environment. The difference between the summer and winter
ammunition
was the composition and form of the rocket powder (see the ammunition
page for
more details).

The new front sight could also be
used as a
range finder. According to the manual a T34 would fit in height inside
the
square of the post at a distance of 150 meters. Note the white painted
post.
Judging the distance was of course
also very important. This could be
done like the illustration above shows. In a prepared defence position
the
firer would have surveyed the terrain/road in front of him and taken
notes on
the various distances to known objects. This way he would know the
correct
distance to the target from the objects it was close to.
In order
to obtain a effective hit (one that
actually stops/destroys the tank) a separate manual was written up, the
"Panzerbeschußtafel" (Template for tank destruction) Heeres
Dienstvorschrift 469, issued on 30. September 1943. It contained
pictures of
most known tanks at the time, with graphics showing the tanks
vulnerable areas.
All German anti-tank weapons had their own appendix in this manual, the
8,8 cm R
PzB 54 was the H.Dv. 469/3e. This is also the first
documented use of the
model designation in a manual.
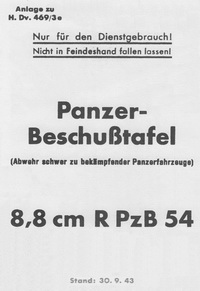
The picture above can be clicked
on and will
give you the whole appendix to the manual.
The
appendix was a tiny book, with no cover and
consisted of 12 pages (3 folded pages with a pair of staples). It was
good
reading in the barracks, but nothing to bring to the trenches. So 9
months
later a pocket version was born, printed directly on cardboard. This
could be
carried by the individual soldier in the field and would withstand the
elements
better than its predecessor.
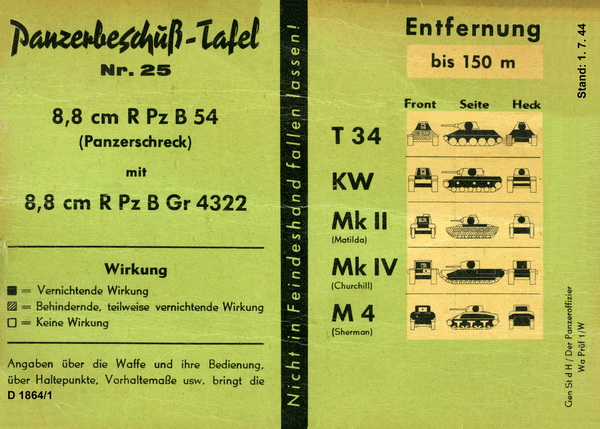
The
improved Panzerbeschuß-tafel from 1 July
1944
The last
time the
"Panzerbeschußtafel" is mentioned is in the "Heerestechnische
Verordnungsblatt" from 15 January 1945. This document introduced both
the
Raketen Panzerbüchse 54/1 and the Raketen Panzerbüchse
Granaten 4992 to
service. The document ends with the following text:
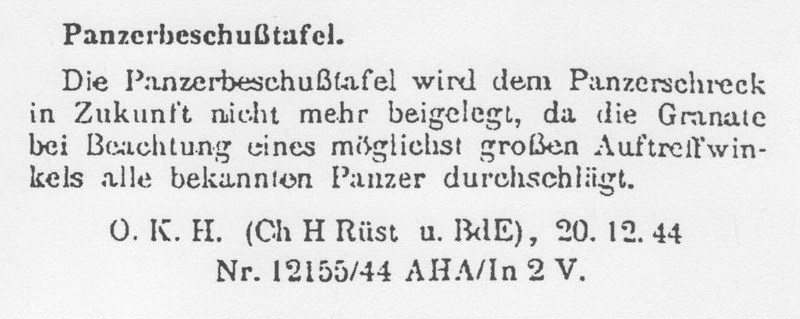
"The Panzerbeschußtafel
will in the future no longer be
distributed with the Panzerschreck, since the rocket will penetrate all
known
armour as long as the optimum hit-angle is used".
The "Deckungszielgerät"
All weapons fired at an enemy will draw counter fire. This has been a
fact
since people first starting throwing things at each other. The German
forces
had tried to deal with this since the trench warfare of the first world
war.
The solution they came up with was the "Deckungszielgerät". A device
that enabled the shooter to stay in cover while operating his G98
rifle. The
same device was reinvented in 1943 for use with the self-loading G41
rifle and
captured Russian SVT40 rifles, but could also be used with the standard
bolt action
K98k. It was later also used with the G43/K43 rifle. It was called the
Deckungszielgerät 43 (DZG43).
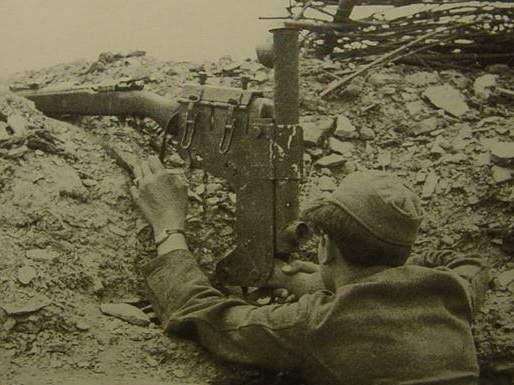
The
DZG43 in use on the Eastern front with a
Mauser K98k rifle.
The DZG43 absorbed
the recoil through a secondary butt
stock, held directly by the firer. A version for machine guns also
existed, but
never went to full scale production like the DZG43.
The Panzerschreck was a completely
recoilless weapon, so in theory a DZG
should be no problem to manufacture for this weapon, but it was not a
priority
and the resources needed to manufacture such a device was used on other
projects. But the blueprint for such a device was printed in the
publication
"Von der Front für die Front". Normally these hint, tricks and
suggestions
carry the name of the inventor, but this one doesn't, so it might have
been a
product of the OKH/AHA.
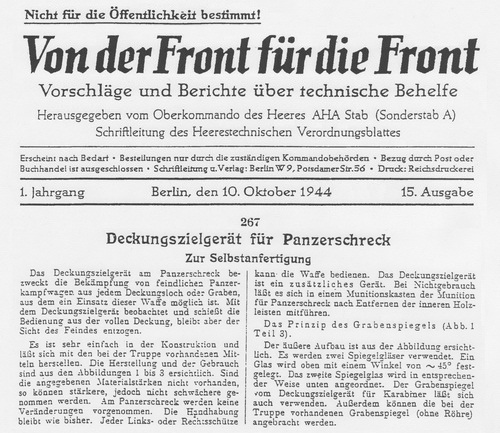
The DZG for the
Panzerschreck was never manufactured in
numbers. It was meant to be made by the units themselves by the means
available. This would typically mean the armourer at battalion level,
the
"Waffenmeister". It could be manufactured with thicker materials, but
not thinner, if the correct materials weren’t available. No alterations
had to
be made to the weapon, and the handling of the weapon would be the same
as
before. The DZG could be used by both left and right-handed shooters.
The DZG
was considered an accessory, and by removing the wooden supports in the
standard ammunition box it would fit inside. The trench mirror could be
manufactured by the armourer, or a standard trench mirror from the
DZG43 could
be used. The trench mirror gave no magnification; it simply relayed the
view
through the sights to the firer, keeping his head low.
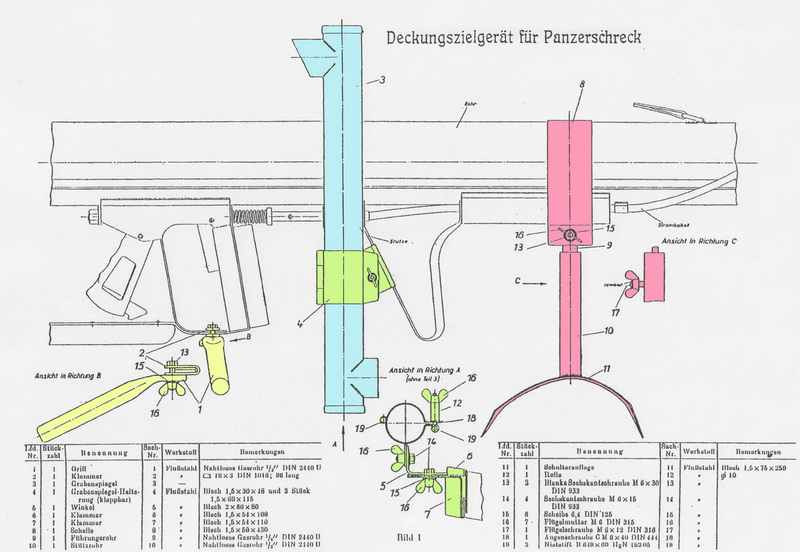
The
drawing that accompanied the text above.
Parts have been colorized by me to make it more understandable.
The added benefit from using the
DZG was that the protective shield
could be dropped, thus lowering the profile and the chance of detection.
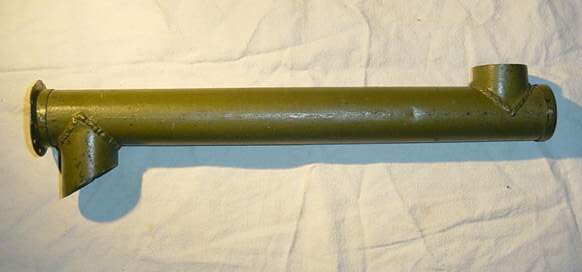
The
standard trench periscope for the DZG43 was also used on the DZG for
Panzerschreck.
The
Mystico Corner
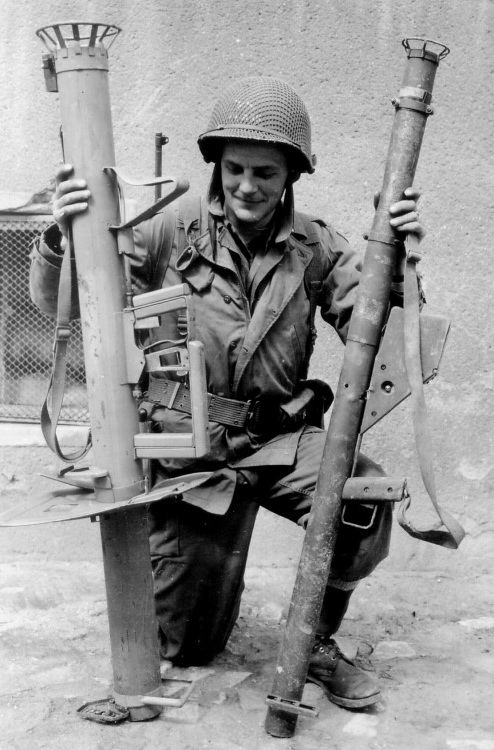
The picture above
shows a US
soldier inspecting a captured RPzB 54/1 and comparing it with a US M1
Bazooka.
There are several aspects about this picture that are worth commenting.
The M1
Bazooka is severely damaged in the middle of the tube. It has what
appears to
be a bullet hole, and has shrapnel damage making the tube bulb and bits
of the
wood board missing.
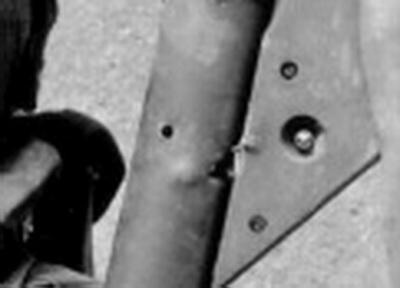 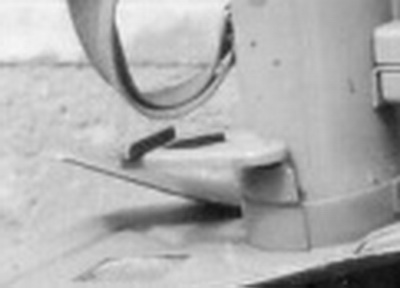
The RPzB 54/1 has
the Model IV rear sight (note the bent lower edge), and just below this
what
appears to be a Handschutz in the open position, the cover plate to
protect the
firers right hand.
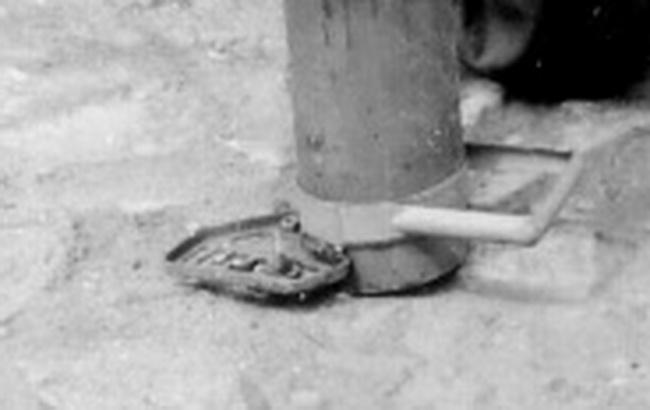
The most fascinating
detail is the front sight. This is the only picture I have managed to
find that
shows the Model IV front sight in use. All the 3 post are visible, and
appears
to have white painted tips. The frame that holds the front sight is a
early Model II version with a
"Abdeckblech", the nut plainly visible. The bright reader would find
this strange, as the new front sight frame came into production
mid-1944, while
"production" of the RPzB 54/1 started in the end of 1944. The
explanation can be found in the section about the RPzB 54/1.
Update
1
Got
this picture from Bill Bogdan. It shows a ground dug
Panzerschreck with the Model IV front sight still in place and mostly
intact.
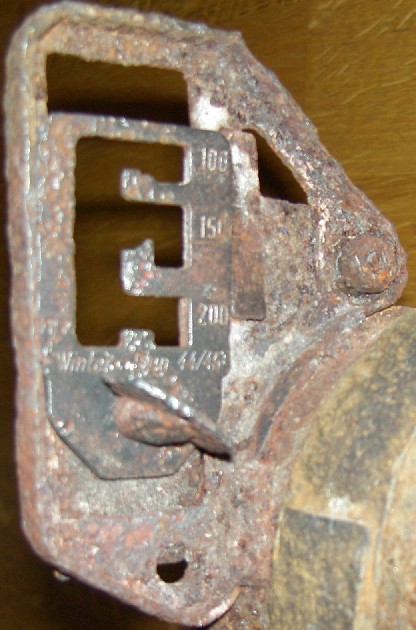
Of special note is the non-regulation (probably) brazed on plate to the
right with the aligment mark.
Update
2
The
pictures below show a new variety of the rear sight. It is a standard
rear sight that has been upgraded to the Model II standard, with an
adjustable "Kimmenblech". But in addition a Waffenmeister has
added a new element.

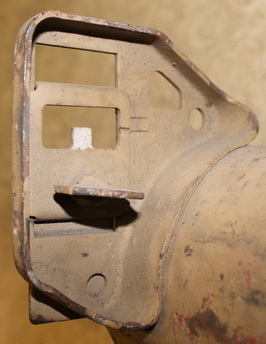
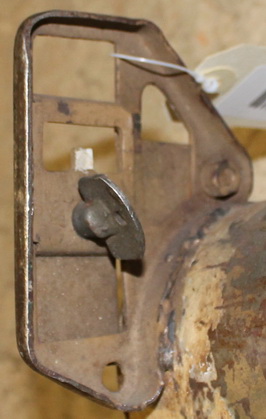
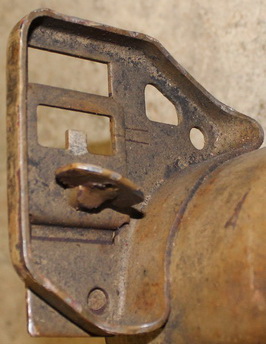
(Pictures
courtesy of Jeff Supertsar)
An
extra sight blade can be rotated into position to make it easier for
the gunner to aim and hit his target at longer distances. This
invention hasn't been found described in any publication or order, so
it was most probably only made locally by a unit's Waffenmeister.
|


 Panzerschreck
- The sights &
sighting
